last updated
|
||||
|
||||
 |
||||
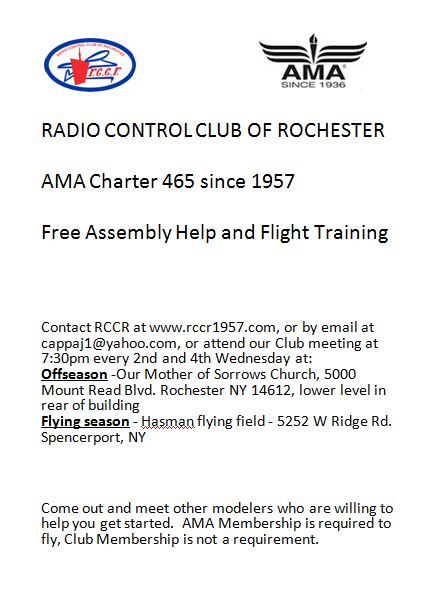
| Tuesday nights 4 PM till sunset reserved for training at Northampton Field (May - September) |


| Read free instructional material |
| MA Sport Aviator's Sure-Start Guide for the New RC Pilot |
|
EVERYTHING YOU WANTED TO KNOW ABOUT ELECTRIC POWERED FLIGHT An E-Book by Ed Anderson, President, Long Island Silent Flyers.
|
| GettingAirborne.com |
|
ScienceGuy |
|
Best Model Plane for Beginners |
|
RUBBER BAND POWERED AIRPLANES THAT FLY GREAT |
|
There is ten tons of internet information about R/C, and in particular about model aviation. Seems the latest information contains information about the Electric RC airplanes, and especially for beginners. Here's an example of a site called ELECTRON or plawner.net, or whatever page you happen upon. It is a site with "too much information" but, on the other hand, what do we old guys know? Give it a chance, you may even discover your first airplane, and, who knows, it may even be an Easy Star, or not. |
| What's a Good First Plane? |
|
Attention - Educators from AMA: The work of the Education Committee represents the "Academy" in our name. Our mission is to promote model aviation as an educational tool, in formal classroom and non-formal, after-school settings. |
|
AMA's
magazine MODEL AVIATION has some articles for newcomers entitled FROM
THE GROUND UP. |
|
SPORT
AVIATOR
IS AN ELECTRONIC MAGAZINE AND ONE OF THE BEST GUIDES FOR
|
 |
 |
|
From Sport Aviation, Feb. 1999
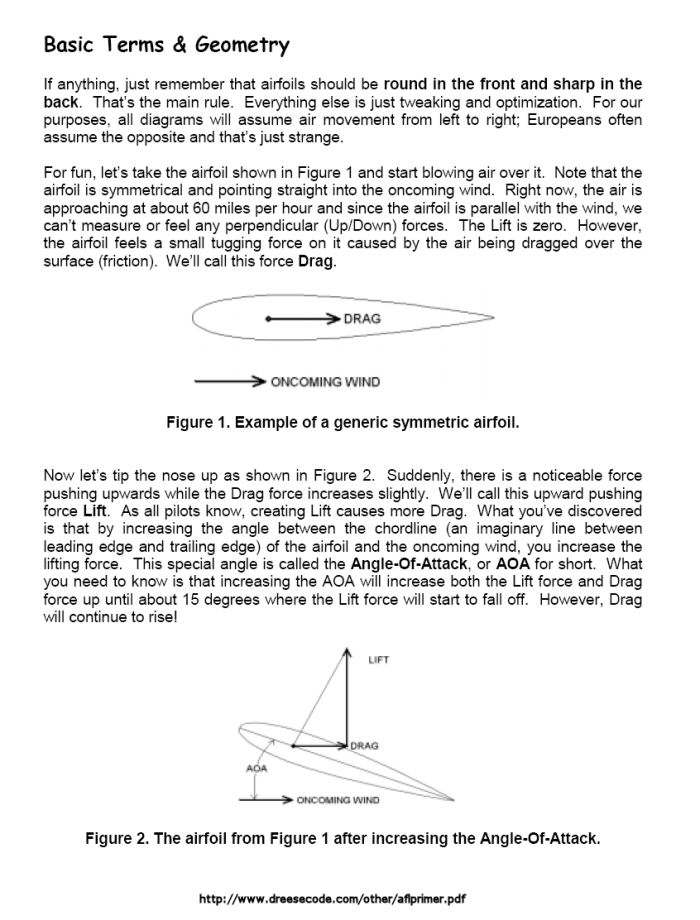
David Anderson Many ask the simple question "what makes an airplane fly"? The answer one frequently gets is misleading and often just plain wrong. We hope that the answers provided here will clarify many misconceptions about lift and that you will adopt our explanation when explaining lift to others. We are going to show you that lift is easier to understand if one starts with Newton rather than Bernoulli. We will also show you that the popular explanation that most of us were taught is misleading at best and that lift is due to the wing diverting air down.
c'mon, get physical |
|
Animated Engines www.keveney.com/Engines.html |
|
There's some really good stuff for kids and
educators: The K-8 Aeronautics Internet Textbook http://wings.avkids.com |
|
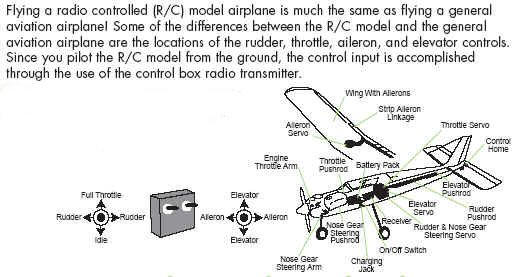
Congratulations! …
and welcome to the
exciting world of Radio Control (RC) model aviation. Included in this
brochure is information and a few simple tips that will help you to have
hundreds of hours of fun and enjoyment with your new model.
What Is Radio Interference? Do
You Need Help Flying Your Model?
What Is the Academy of Model Aeronautics?
Would You Like To Know More? AMA
Would Like to Help |
|
Hey, this hobby even has a web site named :
http://www.gettingstartedinrc.com/ |
|
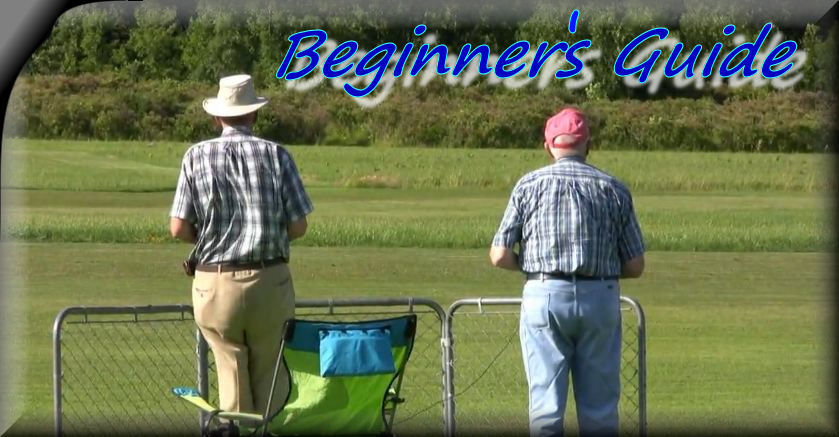
BEGINNER’S PERSPECTIVE:
Learning to fly is a very exhilarating, challenging, rewarding, and fun
activity! I highly recommend it to anybody who is interested. |
|
Learning How To Fly Step one to learning how to fly - Keeping your plane in the air This article is similar to one published in a series over the winter aimed at helping instructors teach RC flying. However, this article looks at RC flying from the perspective of the student. It should be refreshing to beginners to know that all instruction can be divided into four basic steps. Knowing this should help you organize all facets of flying into one of four steps and help you know exactly where you stand each step along the way.
In this article, we limit our discussion to helping you with the first step you need to master. Your goal in this step will be to keep the plane in the air. To do this, you must be able to make turns in both directions without gaining or losing altitude. As your instructor will explain, turning is a three step procedure. First, you bank with aileron until your plane achieves the desired bank angle (usually no more than about 20 degrees of bank). Second, actually turn by applying up elevator. And third, at the completion of the turn, you apply opposite aileron to exit the turn and return to straight and level flight. There are many factors that can make turning different from one turn to the next (plane type, wing configuration, amount of dihedral, and especially wind direction and velocity), meaning every turn will require slightly different stick movement amounts. Additionally, you can control the sharpness of the turn by applying differing amounts of aileron and elevator. The more aileron you apply to enter the turn, for example, the sharper the turn will be - and the more up elevator you'll need to hold your altitude. Considering all the factors that affect your turns, you'll need a lot of practice under all kinds of flying conditions to truly master turning. Typical Practice For your first few tries - Your instructor will begin by having you make smooth gradual turns. He will get the plane in the air and flying at a relatively slow airspeed (about half throttle). At this speed the plane will be quite docile. He will typically get the plane in an attitude that it is ready to turn in one direction or the other. If you have the trainer system, he will then push the button that gives you control and tell you which way to turn. You do your best to turn as instructed (he'll probably talk you through each turn for a while). If he thinks you have made a mistake and the plane is in danger, he'll retake control and set up for another attempt. Attempts should be practiced equally in both directions, right and left. Once you master your first level turn, he will allow you to continue flying until you have problems, challenging you to see how long you can go before he must retake control. In these early stages, it is likely that he will retake take control soon after your turn attempts. But eventually, you'll catch on to the required stick motions and be able to make the plane turn as instructed. He will have you continue to practice, making you turn equally in both directions. Once you catch on - Most instructors will get you practicing a figure eight pattern soon after you master your first turn. Figure eights are great for practice since they force you to practice turning both left and right. Also, since the instructor knows what it is you are trying to do at all times, they can easily judge how you're doing. The easy figure eight is when making left turns on the right side of the field and right turns on the left side of the field. Once you master smooth gradual turns in both directions, he will have you practicing more severe turns (with more bank angle), requiring more aileron and elevator. He will also have you reverse the direction of the figure eight (making right turns on the right side of the field). Advanced Practice One of the hardest tasks to master in this step is holding the desired bank angle throughout the entire turn. Most docile trainer planes tend to self correct. Once aileron is applied and the plane banks, it will have the natural tendency to straighten itself out. This degree of self correction varies from plane to plane. I've seen some planes that even have different self-correcting qualities from right to left hand turning (possibly caused by improper engine thrust). In any event, you must be able to hold your desired bank angle for the duration of the turn. The longer the turn, the harder this can be. To practice holding bank angle, your instructor will have you making full 360 degree turns (again, in both directions). He will have you fly down the middle of the runway. When the plane is centered on the field, you will begin the turn, (in a direction away from the pits). Your goal will be to maintain a smooth, gradual turn for a full circle. Depending upon your plane's self correcting qualities; it is likely that you will have to make gentle corrections with aileron during the turn to maintain the bank angle you want. Typical Problems The up/down problem - Most beginners have trouble remembering which way is up. Remember, when you pull back on the stick, the plane goes up, just like a full scale airplane. To help with this problem, try holding the transmitter in a more horizontal attitude. Not getting up in soon enough - As soon as the plane begins to bank, its lift decreases, causing the plane to go into a dive. As soon as you see the wingtip drop in the direction of your desired turn, you must begin applying up elevator. If you do not, the plane will lose altitude in the turn. The more severe the bank angle, the less lift there will be, and the more up you must apply to hold altitude. Applying up before the wingtip drops - This is the opposite of the previous problem. If you apply up elevator too soon, the plane will begin to climb. As it does it loses airspeed and will eventually stall. With decreased airspeed comes a sluggishness in aileron response, meaning it will be harder to make the wingtip drop in the desired direction. Since this problem usually occurs after having problems getting up in soon enough, I call this "wishing the plane around with the up". Ballooning problems - Many trainer planes have flat bottom or semi-symmetrical wings. It is a natural characteristic for this kind of wing to have more lift when airspeed is increased. The faster the plane goes, the more it wants to climb. You may have some downthrust in your engine to attempt to counteract this tendency for gaining altitude with engine speed. However, keep in mind that throttle speed is but one of the factors that contribute to airspeed. If your plane loses altitude in a turn, for example, it will pick up airspeed during the turn. You eventually finish the turn and apply opposite aileron. When you do, your plane's increased airspeed will cause the plane to climb. I call this ballooning, since it looks like the plane is just rising for no apparent reason (like a hot air balloon). The best way to avoid ballooning is to make level turns that don't cause the plane to lose altitude. If you see that the plane is losing altitude in the turn, you can minimize ballooning by applying a small amount of down elevator after the turn is finished. The plane will eventually slow enough so as not to rise. Forgetting which way you're turning - Beginners are prone to forget which way the plane is turning during a turn. While this sounds like a very basic problem, it is quite common. If you forget which way the plane is turning, you will likely apply the wrong aileron direction to exit the turn. When you do, the plane will dive deeper into the turn instead of righting itself. Though some of this problem will go away with practice, you may have to make a conscious effort to remember which way the plane is turning in every turn. Left is easy; right is hard - Or vice versa. It is likely that you will master turning in one direction faster than the other. However, you have not truly mastered step one until you can turn equally well in both directions. Figure eights are the best way to practice turning in both directions. Not being able to hold the correct bank angle This is the hardest thing to master in step one. The longer (and more gradual) the turn, the harder this can be since most trainer planes are very self-correcting. Here's something that may help. You know your right stick controls aileron and elevator. It has a neutral position (spring-loaded). When you let go, it snaps to the neutral position. Too many beginners tend to let go of the aileron stick during a turn and let the plane fly in its neutral aileron position. While this position makes a great point of reference, flying is very dynamic. All conditions change through every maneuver you do. This means you will commonly need to hold the stick somewhere other than in its neutral position as you fly. The sooner you realize that the neutral stick position is ONLY a point of reference, the sooner you will master flying. In all cases, you must "fly what you see", making your stick position go where ever it must to get the desired results. To illustrate this, say you are making a 360 degree gradual left turn. You bank with left aileron to get the desired bank angle. As the plane begins to bank, you bring in up elevator. You release the aileron, once the bank angle is achieved (to neutral). However, during the turn you notice the plane is beginning to "flatten out" (self correct back to straight-and-level flight). You will need to bring back in a very small amount of left aileron to maintain your bank angle. As continuing the left turn, you will eventually find out that you must maintain small amount of left aileron for the entire turn. On the other hand, you will also have times when the plane may fall deeper into the turn than you wish. Maybe you gave too much aileron to enter the turn. Or maybe the wind is blowing the plane deeper into the turn. In either case, you will have to apply gradual opposite aileron to counteract this tendency throughout the turn. The point is: the aileron's neutral position is only a point of reference! You will often need to hold in a small amount of aileron to maintain turns. Checklist for success As when learning any new subject, it is helpful to take pride in the small steps you master along the way to achieving your ultimate goal of being able to fly by yourself. This gives you confidence to continue and helps let you know where you stand in the overall scheme of things.
Step two to learning how to fly - Setting and holding headings At the completion of step one, you can keep the plane in the air without help from your instructor (except for take offs and landings). You can turn equally well in both directions and have gotten the left/right mistakes out of your system. However, the plane may still be "flying you" to some extent. You may still find yourself reacting to the plane at times instead of directing the plane to do what it is you want. Your second major goal will be to have complete control of the plane's attitude and heading at all times, and you must master this step in order to begin learning how to land. To understand this need for setting and holding headings, watch how your instructor lands your plane. As they begin setting up for their final approach, they must get the plane in a rather precise position (at a specific altitude and on a planned heading). They must then begin their final approach turn. This turn must be very precise, since at the completion of this turn, the plane's heading must be perfectly in line with the runway. Once in line with the runway, the heading must be held all the way to the ground. (More on how to land in step four). If you truly master step two, rest assured that landing will be a simple extension of what you already know. Typical Practice For your first few attempts - Once again, figure eights make the best place to start. Your instructor will get you back into your figure eight pattern making left turns on the right side of the field and right turns on the left side of the field. But this time, you will concentrate on exiting each turn in a predicted manner. I have beginners practice setting headings corresponding to the corners of the field. I tell them to try to have the left/right center of the figure eight right in the center of the field. If you have truly mastered step one, this should be relatively easy. In fact, you may have already mastered the ability to precisely exit turns in the figure eight pattern from step one. Once you can perform the figure eight in this direction, you will practice in the other. This practice shows whether you can truly exit turns in a precise manner (setting a heading). As you begin to catch on - Your instructor will then have you lengthen the straight legs of the figure eight. He'll have you send the plane further away in both directions. Now the goal will be not only setting a heading, but holding the plane's heading precisely during the entire straight leg. You'll have to make minor corrections during each straight leg to hold the heading. You’re really catching on - Once figure eights are mastered, your instructor will have you practicing approaches. Though you will be keeping the airplane high in the air and not cutting throttle as you would when landing, you will begin practicing what it takes to land. Your instructor may have you practice this with an oval pattern. The near side of the oval will be the center of the field. Say, for example, you have the plane heading from right to left and parallel to the runway. Once the plane is at the left end of the field, you'll begin a gradual right turn. At the completion of the turn, you will set the plane's heading parallel with the runway, flying from left to right. You hold this heading all the way to the right side of the field. At the right side of the field, you'll make another right turn, exiting the turn with the plane right on the middle of the runway. Once you master this, you'll reverse the direction of the oval. Advanced Practice The problem with oval patterns is that you are constantly making turns in the same direction. This leads to becoming more comfortable turning (or approaching) from one direction than the other. Additionally, with wind conditions as they are in the Chicago area, you'll have to be able to land from both ends of our field. For this reason, I use a modified figure eight pattern to practice high altitude approaches. Say the plane is coming down the middle of the runway from right to left. Once the plane passes the center of the field, the student will make a 45 degree right turn. They will hold this heading until the plane is far enough away to make the approach turn (without crossing the flight line). They will then begin a long sweeping left turn, ending the turn right on the middle of the runway. They will hold this heading until the plane passes the center of the field, then make a 45 degree left turn and perform the "mirror image" of this maneuver on the right side of the field. This forces the student to equally practice making both right and left approaches. When you can repeatedly perform this maneuver, you have truly mastered the ability to fly in a very precise and controlled manner! Typical Problems Exiting turns too early or late - Beginners tend to have problems determining when to begin to apply the opposite aileron to exit turns. If you wait too long to apply opposite aileron to exit the turn, the plane will overshoot your intended heading. If you’re early with opposite aileron, the plane will undershoot. Either leads to the need to "milk the plane back?' to its desired heading. Keep in mind that the better you are at setting your headings, the easier it will be to hold headings. Wandering - When the plane is on its desired heading, beginners have the tendency of applying too much aileron when making corrections to hold the heading. This leads to the plane veering back and forth from left to right. While the plane is generally heading in the right direction, its motion is not very smooth. You must remember that corrections needed to hold headings must be very gentle as compared to actually making turns. Judging the plane's true position relative to the field - As you begin practicing your high altitude approaches, you may find it very difficult to get the plane on a heading that makes it go right down the middle of the runway. While you must eventually be able to do this, begin by practicing getting the plane flying parallel to the runway. Don't worry if the plane is too far out or too close in (as long as you don't cross the flight line) as it flies by. With continued practice, you'll eventually be able to judge when to exit your final approach turn to put the plane right in the middle of the runway. Checklist for success
Step three to learning how to fly - Taking off If you have truly mastered steps one and two, taking off is relatively easy - as long as you can takeoff directly into the wind and your plane's ground tracking is correctly adjusted. In this step, you will be in control even when the plane is very close to the ground, meaning the trainer system will allow your instructor the immediate access he needs to retake control if you get into trouble. Certain instructors may refuse to help you with learning how to takeoff if you don't have the trainer system. Whether or not you have the trainer system, I recommend practicing your ground taxiing while the field is not busy. Come out early in the morning before the crowd arrives or take your plane to the helicopter hover area to practice. Do not hog the main runway to practice taxiing while others are flying. Typical Practice With taxiing - You can start your taxiing practice long before beginning step three. Any time there is no one at the field, you have the whole runway to yourself. By all means, fire up your engine and practice taxiing (just be sure the plane doesn't build up too much speed!). If you have a four channel system (as most do), your left stick will control both rudder/nose wheel and throttle. Though you haven't been getting much practice using your left hand, you will need to become proficient with it before you can takeoff. The hardest thing for beginners to get used to when taxiing is that it takes more throttle to get a plane moving that to keep it moving. If you slowly increase throttle until the plane begins to move, it will continue accelerating until you reduce throttle. This can be scary! My recommendation is that you apply throttle in short bursts. To get the plane moving, goose the throttle to slightly over half then quickly reduce back to idle. With practice you will get to know just how much throttle you need to get the plane moving. You will also need much practice with steering with your left hand. Your first few takeoff runs - I recommend that you practice takeoff runs (without actually taking off) for three reasons. First you must be able to abort takeoffs. If the plane starts heading in the wrong direction, you must know when to abort. Practicing takeoff runs with no intention of actually taking off forces you to do this. In essence, a takeoff run is an aborted takeoff. Second, a very small amount of rudder/nose wheel control will have a big impact on your takeoff run. It is likely that you will over control during you first few takeoff runs, possibly heading the plane right for the pits! Knowing before you start that you will be aborting the takeoff will help with this practice. Third, practicing takeoff runs also forces you to practice taxiing. To practice, you will need to taxi the plane out to the runway and head it into the wind. You'll slowly increase the throttle until the plane starts moving. As the plane continues to increase in speed, you must be able to keep it heading into the wind (with your rudder/nose wheel control). At some point, your instructor will tell you when to abort. As soon as he does, you will immediately reduce the throttle to idle. The plane will slow for you to taxi back and try again. Your first few takeoffs - If you have learned to control your plane on the ground, taking off is really quite easy. You will taxi out just as you do for practicing takeoff runs. Being on the lookout for a reason to abort, you will increase the throttle until the plane begins to move. Using the left stick, you keep it heading into the wind. When it achieves sufficient airspeed, you instructor will tell you to pull back slightly with up elevator to cause the plane to come off the ground. (If the plane is trimmed properly, it may actually lift into the air by itself.) Once the plane is in the air, you will release the elevator and let it climb at a reasonable climb rate (your instructor will help with this based on you engine power and plane type). When the plane reaches a save altitude, you'll make you first turn (ALWAYS in a direction away from the pits!). You'll cut the throttle somewhat and begin your practice flying. You've just taken off! Advanced Practice As stated, it is best to takeoff into the wind. Unfortunately, our flying field's runway (East/West) will sometimes force you to takeoff with a cross wind. Depending upon your plane's win configuration, you may need to hold in some aileron to keep the wing tips level as the plane reaches airspeed. In essence, you are flying the plane while it is still on the ground! The higher the wind speed, the more problems you may have with this. Be ready to abort at the first sign that the wind direction is changing the plane's heading. Typical Problems I can't use my left hand! - Most of us are right handed. For us, it may take quite a bit of practice before you can properly articulate what you want the throttle and nose wheel to do with your left hand. However, you would be foolish to begin trying to takeoff until you master controlling the plane on the ground. And ALWAYS REMEMBER: When you get into trouble, cut the throttle to idle! The recurring left/right problem - Just as you had to master the ability to turn right and left in the air, you may have to do it again on the ground (with your left hand). When the plane is coming toward you, you may be confused which rudder/nose wheel control must be given. Over controlling during the takeoff roll - A very tiny amount of rudder/nose wheel control will dramatically affect the plane's heading during the takeoff roll. This is why you must practice your takeoff runs prior to actually taking off. Not knowing when to abort - This can be a real problem. Too many beginners simply increase the throttle and see what happens. This can be very dangerous! As stated, any number of things (wind, over-controlling, misaligned nose wheel, etc.) can cause the plane to veer from its original heading. It if veers, the results can be disastrous. You must know when to abort. You can practice aborted takeoff runs by simply making takeoff runs. Holding the up in too long - Once the plane breaks ground you must begin releasing the up elevator. Otherwise the plane's climb angle will continue to increase, leading to an eventual stall. Checklist for success
Step four to learning how to fly - Landing In step three, you were practicing high altitude approaches. If you truly mastered this ability in step three, step four will not be too difficult. You'll just be letting the plane come much closer to the ground. A note about engine reliability - This step requires a great deal of throttle changing. Before starting this step, it would be wise to confirm that your engine will maintain idle, go from idle to full, and in general, perform without stopping or stuttering at all throttle settings. Are you really ready to land? -- If all steps to this point have been truly mastered, landing will be simply an extension of what you already know. However if you are having problems mastering step four, it should be taken as a signal that further practice (especially with step two) is needed. Typical Practice Understanding slow flight characteristics - Before you can begin learning how to land, you must understand how the plane responds at slower speeds. With the plane rather high, your instructor will have you reduce throttle to just above idle and fly the figure eight pattern. Note how the ailerons respond much more sluggishly. Also not how, at idle, it is impossible to keep the plane from losing altitude (especially in the turns). Most importantly, note how if you try to maintain altitude by pulling back further with up elevator, the plane will eventually stall. Increasing throttle - As you continue to lose altitude in their figure eight pattern, you instructor will eventually have you kick the throttle back up to regain altitude. You must be able to maintain control even at slow speeds (especially holding a heading into the wind). You must also know at what point your plane will stall. And you'll need to know what will happen during a stall and how to recover. Fortunately, most trainers are very stable in a stall and no radical controls will be required to recover. Practicing real landing approaches - In step two we had you flying with precision. We had you flying right down the middle of the runway (in an oval and modified figure eight pattern). The goal was to hold the heading all the way from one end of the field to the other. Now you will repeat this practice (still up high), but this time you will reduce the throttle for each pass down the middle of the runway. Again, you will need to hold your heading even when the engine is at idle. The plane will be much more influenced by wind when at idle. You will increase the throttle at the end of each pass. With the modified figure eight pattern, you will practice setting up approaches from both directions. The final approach turn - As you become more proficient, you instructor will allow you to let the airplane come close and closer to the ground. Soon, you'll be ready to practice approaches that bring the plane to within about 10-20 feet from the ground. At this point, you must be able to make a very controlled final approach turn. Though this is rather difficult to explain, you must understand that the nose on the plane must maintain a lightly downward attitude throughout the final approach turn (especially if the throttle is cut to idle). This is how we get the plane to maintain airspeed as it comes to the ground. The windier it is, the more important this point (and the more severe the downward attitude). While some pilots try to counteract the wind with higher throttle settings, the descent of the airplane allows much finer control of airspeed than throttle. If the nose of the plane balloons up at the end of the final approach turn, the plane will eventually stall, and you'll know right away to abort the landing. With this condition it will be impossible to maintain airspeed, and if very close to the ground could result in disaster. Actually landing - Once you have progressed to the point where you can consistently align the plane with the runway and bring the plane to within 10 to 30 feet from the ground, you are finally ready to land. Keep in mind that the plane's natural descent at idle will be what causes the plane to descend for landing. You should not have to be forcing in down elevator to cause the plane to come down. During the last twenty to thirty feet of descent, you must keep the wing tips nice and level. As with taking off, you must be ready with sharp, yet precise corrections to keep the plane on the center of the runway. Again the natural tendency of the plane at idle will be to descend, so if the proper heading is maintained, it is a relatively simple matter of waiting until the plane comes to the ground. When the plane drifts down to within about 1-2 feet above the ground, you must gently pull back on the up elevator to cause the plane to flare out. Your instructor will have demonstrated this many times by this time in your flight instruction. Be ready for a few hard landings! -- A beginner's first few landings tend to be a little rough. Though the correct amount of approach practice should help overcome nervousness, landing can be especially unnerving. Beginners tend to panic when low to the ground. They forget which way to turn, especially if minor aileron corrections are necessary. Always remember that if approaching from the right, right is your friend, meaning if they panic, giving right aileron will take the plane in the direction away from the pits. If approaching from the left, left is your friend. Dumping the plane is always better than flying into the pits. Practice overcomes everything - Though a beginner's first solo is a great confidence builder, do not think you have mastered landing just because you have done it once. As with taking off every landing will be different. While you will be very anxious to begin flying by yourself at this point, you'll need a lot of practice landing - in both directions and in different win conditions. One excellent way to practice landing (and taking off) is with touch and goes. After landing (without killing the engine), you'll taxi back, take off, and land again. As you gain proficiency, smoothly reapply throttle as soon as the plane touches down, performing a true touch and go. Typical Problems I can fly a perfect approach up high, but not low to the ground - It is likely that nerves are getting in the way. If you are flying with the trainer system, you shouldn't have to worry about the plane. Your instructor will take over if you get into trouble. Additionally, you may simply need more practice to build confidence. Problems with slow speed flying - Most beginners find it difficult to control the plane at slow speeds. It takes more stick movement when flying slow. Just remember one of our most important rules: "You must fly what you see!" If the plane isn't responding the way you think it should, you need more control. Problems with high speed flying - After losing altitude during a practice approach, you will be smoothly increasing throttle to go around again. As you do, it is likely that your throttle will be increased to a setting greater than normal from previous practice. You must be prepared for more responsive controls with higher throttle settings. Not knowing when to cut the throttle to land - This is a difficult issue to address since every plane has different descent characteristics. Your instructor will tell you when you need to cut and increase throttle for a while. But it's also good to practice, knowing that you can always abort the landing if it appears that the plane will not make the field or overshoot. The plane ends the final turn in an upward attitude - Though it can be hard to do, remember that the plane must descend slightly in it's final approach turn. This is most important on windy days, since the plane's airspeed is much more critical. Checklist for success
Are you ready to fly by yourself? -- The whole point of RC training is to get the beginner to the point where they no longer need help. If you have successfully completed the four steps we have given, you should be ready. By no means, however, should you consider yourself an expert. The practice you have done has been with close supervision. In the real world, there will be no instructor there to take control when things go wrong. You can still get the plane into rather precarious situations. |
|
Why I Need An Instructor
..... from SIG http://www.sigmfg.com/ THE GOLDEN RULE OF SUCCESS IN R/C.
"A
MODEL, ENGINE, OR RADIO THAT IS NOT PREPARED AND WORKING PROPERLY ON
|
|
--- RECOMMENDED BROWSING --- The Flying Penguin Beginner's Guide to Flying FAQ File
Here's how they do it in the UK and
in Prince Edward Island, Canada |
|
There's a large pile of stuff to read -
1.
Visit one of
club meetings.
You will be asked to introduce yourself. Then is the time to ask
to have someone assigned to help - help from someone who is willing to
help you for as long as it takes. |
|
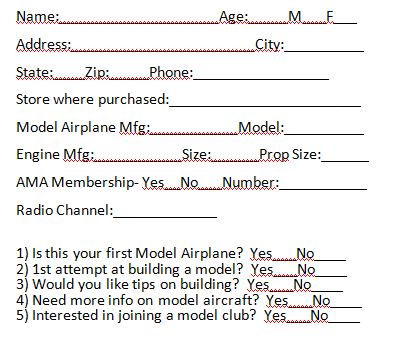
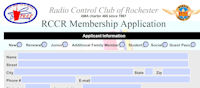
fill this out and bring it to
Northampton any Tuesday 4pm - 'til dark
|
|
To Air is Human - To RC is Divine ABC Park Flyers of Montreal, Quebec, Canada http://www.rc-model-planes.com/index.html |
| NASA Glenn Learning Technologies Project |
| RC Model Airplanes from Winona Aero Modelers http://www.luminet.net/~bkuhl/airplane.htm |
|
EASY R/C - Tower Hobbies has a few new web pages that may help you make some decisions about the stuff you need. They even have a shopping list that may help you get organized. Of course you'll probably come up with some new questions, ideas, and whatever. By looking at what's available from the Tower, you can be better prepared to visit your local hobby shop, armed with questions and ready to shrug off whatever you decide you don't need, and pick up some pointers that the Tower missed. So click here to get started in R/C Basics, Airplanes, Sailplanes, Helicopters, Cars & Trucks, Boats, Radio Systems, Engines, Ordering Basics, R/C Dictionary. |
| Flight Instructor - Richard Brook has kindly offered his pager number 746-5668 to assist student pilots in arranging flight instruction. As long as you don't keep bugging him, he says it's O.K. to call him at any reasonable hour. |
| Now that you have read all of the above, and are thoroughly confused and discouraged and frustrated - come on out to Northampton Park Model Flying Field in Brockport, on Tuesday 4 pm 'til sunset, May through September. You'll be pleasantly surprised at the real thing. Make yourself known, join in the fun, and fly safely. |
| If you're flying now and want some advanced training, one of the best books can be found at http://rcpilotguide.com/home/index.htm |
| F I E L D E T I Q U E T T E |
|
COMMUNICATE IT
"Coming
out" as you prepare to place your aircraft on the runway. And the warning cry for everyone to look out for something out of control - "HEADS UP" |
|
Field Etiquette by Sam Hart
1.
When setting up your equipment in the pit area, don't set up too close
to others who have already set up. Spread out and be considerate of
their space. |
 |
|
Noise Recommendations The RCCR is committed to being a good neighbor, especially with regard to noise control. We take concerted effort using practical means to fly low noise airplanes. We recommend trying to achieve less than 96 db at 9 feet at full power on the ground, and less than 75 db at full speed in front of the flyer at 100 feet height when flying. There are 3 primary sources of noise generated from our activities:
1.
Engine/Muffler
2.
Propellers/Speed
3.
Airframe We strongly recommend you consider the above recommendations when you select what you buy and fly. While most 0.40 size trainer plane combinations will be acceptable from a noise standpoint, we think you will enjoy starting with quiet equipment such as 4-strokes, quiet mufflers and propellers. Trevor Ewell, January, 2001 |
FREE FLIGHTWestern NY Free Flight Society |
| Radio Control Club of Rochester |